When selling Medicare/Med Supp, you have a lot of choices when it comes to what programs to use for prospecting. The caveat is that not all methods work for every agent and not all methods work for every prospect either. But there are so many options available so it’s difficult to know which one to use.

ProspectBoss is the only option that is truly an all-in-one platform. From one program, you can download leads, make calls, send texts & video messages, emails & video emails, video conferences, drop ringless voicemails, AND have follow-up drip campaigns as well! Let’s walk through the processes so that you can be the most successful prospecting for Medicare using ProspectBoss.
Downloading Leads
Using the ProspectBoss lead store, you would use the B2B or B2C data list. If you plan on making calls with this list, you will want to click the button at the top that says Scrub against the DNC. Enter the zipcodes (or state if you have statewide search) you want to pull leads for, then select your criteria. For Medicare, these are the criteria that we recommend but you are not limited to these options:
- Month & Year turning 65 – choose months that are 3-6 months out from when they turn 65. Ex. May, June, July, Aug, Sept, Oct 1956
- Income more than 30K/year
You will click submit and it will then give you the number of results found that match all the criteria you entered. You would then click Download.
These results download as a CSV file and that is the format that you will upload into a calling campaign in the ProspectBoss CRM Dialer platform.
There is another option for pulling T65 data from the data list and that is the ProspectBoss T65 Interactive Heat Map. You would select up to 5 counties on the map that you would like to pull data for, and then click download. You will get a CSV file for those leads as well to upload into the ProspectBoss CRM Dialer platform.
Creating a Calling Campaign
In your ProspectBoss CRM Dialer platform, you have a menu on the left-hand side of the screen. Select Calling Campaigns, then Create Campaign. There are 4 sections to creating a campaign and they are all very simple.
Section 1
Name your campaign. We recommend being very specific when naming campaigns. The reason is that if you are using the system consistently, you will have many campaigns over time so you want to know exactly what type of leads are in each campaign for easy reference. For example T65 Oklahoma City May-Oct 1956.
Country. We currently only have the USA & Canada as options for this.
Scripts. You can choose to upload a static script, meaning the entire script shows on your screen with no movement. OR you can choose to set up a Dynamic script. These are scripts that will bring up the next part you need based on the responses from your prospect.
Import Contact List. This is where you will upload your CSV file with your prospects that you downloaded in the previous step.
Section 2
On-Hold Recordings. These are a series of recordings in the platform that buy you some time if you have 2 prospects that answer your call at the same time. This is only the case if you are using the 3 or 4 line options of the system. These recordings have been proven effective. You can choose from a female voice or a male voice. Make sure you choose the one for your gender because the last (3rd) recording says “I’ll call you right back”. Then the system will stop dialing after you are done with the first call, and you can then dial that lead back making you a person of your word right off the bat.
You may also have a pre-recorded voicemail recording to be dropped if you get voicemails while going through your list.
Caller ID. You have 3 options for your caller ID. You can choose your own number (any number you wish), local presence meaning a number ProspectBoss owns with a local area code to where you are calling, or you can use the PB number that is assigned to you when your account is created.
Number of Rings. Number of Lines. Enable Video Call. These options are your preferences on how many times you want the phone to ring on the prospect’s end before hanging up, how many lines you want to use (ex. If you purchased the 3 line dialer but you only want to use 2, you would select that here) and this pertains to how many phone numbers from your list the system will dial at the same time. And enable video call is for if you know both you and each prospect has the equipment to video conference, you can do so.
AutoPause, Recording, & Time Zone Protection. Enabling auto pause will make the system pause after each set of dials so if you are on the 3 line dialer system, it will dial your 3 numbers, then pause so that you can finish up any notes or dispositions before it dials the next set of 3 numbers. Enable recording is always a good idea. This will automatically record every phone call. Time zone protection is for if you are calling into different time zones. You don’t want to call the west coast at 5 am because you start calling at 9 am from the east coast. That would not be good!
Section 3
Send Mail, Send Text. If you have created an email that you want to send to your prospects (and you have their email address), you can opt to do that from this step. This is especially helpful because we have automated this in a really neat way. If you leave a voicemail, the system will automatically send an email as well! So your email subject line would be something like “I just left you a voicemail and wanted to follow up with an email as well.” That way they connect the two methods as the same. You can also opt to send a text should the prospect approve it. We recommend making your text message like a digital business card.
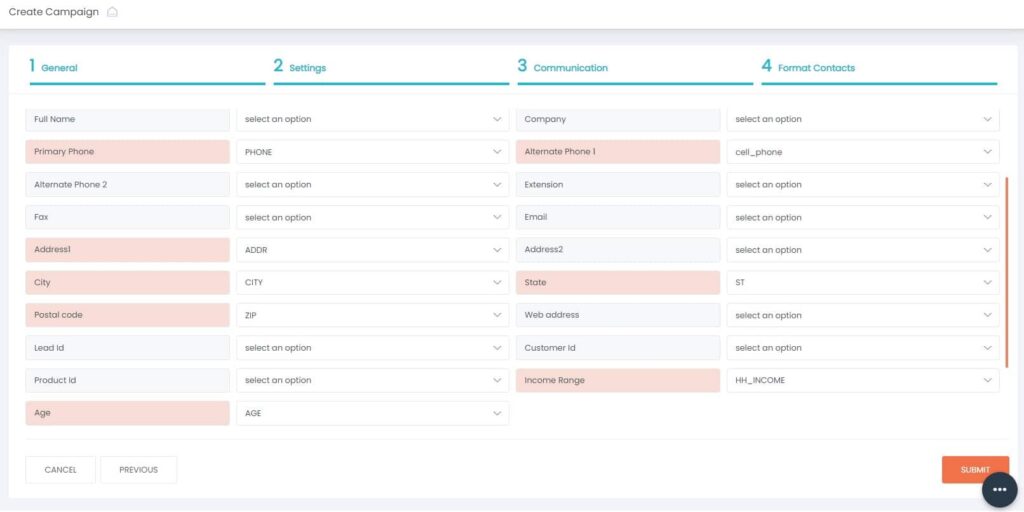
Section 4
Formating Contacts. This is where you will match your CSV file results with your system. For each area that you want or need, you will match. So where it says First Name, you would click for the drop-down menu next to it, and select FN or first name, Last Name you would select LN or last name. Phone Number, Address, City, State, Zip, DOB, Income, etc. When you are done with that, hit submit! A pop-up box will show Calling Campaign Created Successfully. Hit ok and it will take you to your calling campaigns showing the newly created one at the top.
Then you can make your calls and set your appointments!
A couple of dispositioning best practices though to keep in mind:
- Hot Lead: Use this for prospects ready within 1 month
- Warm Lead: Use this for prospects ready within 3-4 months
- Cold Lead: Use this for prospects ready within 5-6 months
You never want to just get rid of a prospect simply because they aren’t interested right now. The only time you want to use Not Interested is if they state to take them off your list. Not Interested removes them from your list and you will not be able to prospect to them anymore.
Also, if you get a cold lead as defined above, make sure you are following up with them. Don’t just forget about them. Send them an email in a couple of weeks, try calling them again in 3 months. Just make sure to follow up!
ProspectBoss Team
We cater to Real Estate & Insurance agents but love seeing clients from all industries using our solution successfully. From lead generation and tracking to CRM and data resources, we’ve got the solution for all your prospecting needs.
Call our Sales team at 800-662-4009 or send us an email at sales@prospectboss.com
We look forward to hearing from you!
Trackbacks/Pingbacks